Maps maker pro: the #1 mapping plugin for WordPress › Maps Marker Pro
Knowledgebase › Maps Marker Pro
Articles
FAQ
References
User guides
Account and license management0
Affiliates0
APIs0
Augmented Reality0
Backup and restore0
Basemaps0
Bulk actions0
Changelogs0
Clustering0
Configuring settings0
Filters0
Geocoding0
GPX elevation charts0
GPX tracks0
Import and export0
Installation and setup0
Layers0
List of markers0
Managing tools0
Migration from v3.1.10
Miscellaneous0
Plugin Widgets0
Pricing0
Resellers0
Starter guide0
Tips and tricks0
Translations0
Troubleshooting0
Working with maps0
Working with markers0
Affiliates
How to get your Maps Marker affiliate ID
User guides
I want to promote Maps Marker Pro with links and banners on my website. Do you have an affiliate program?
FAQ
APIs
Action hooks reference
References
Filter reference
References
Database API
References
JavaScript API
References
MapsMarker APIs overview
References
Shortcode API reference
References
Augmented Reality
Managing tools – Backup and restore
Basemaps
Community curated list of custom overlays
References
Community curated list of custom layers
References
Managing tools – Bulk actions
Changelogs
Changelog for Maps Marker Pro (dev)
References
Changelogs for Maps Marker Pro
References
ARCHIVE – Changelog for Leaflet Maps Marker
References
Working with maps – Clustering
How to change the color of marker clusters / display an icon below clusters
User guides
Configuring settings
How to add a track description to a GPX track
User guides
How to change the directions link settings and/or directions provider
User guides
How to change the permission settings
User guides
How to change the visibility and permalinks of fullscreen maps and API endpoints
User guides
I messed up with the plugin settings – what can I do?
FAQ
Working with maps – Filters
How to add filters to a map
User guides
Configuring settings – Geocoding
How to find the IP address of your server
Articles
Algolia Places Sunset – background & alternatives
Articles
How to setup TomTom geocoding
User guides
How to setup LocationIQ geocoding
User guides
How to optimize geocoding settings for more targeted search results
User guides
How to setup MapQuest geocoding
User guides
How to setup Google geocoding
User guides
How to setup Algolia Places geocoding
User guides
How to setup Photon@Mapsmarker geocoding
User guides
Geocoding providers overview
Articles
Working with maps – GPX elevation charts
How to display the elevation chart on a different position of your site
User guides
Working with maps – GPX tracks
How to use GPX extensions to customize tracks
User guides
“File type not permitted for security reasons” error when trying to upload a gpx file
FAQ
Can tracks from fitness trackers be displayed on maps?
FAQ
Can I add multiple GPX tracks to a map?
FAQ
Can I manually draw a GPX track on a map?
FAQ
How to convert a non-GPX-track file into a GPX track file
User guides
Can I display routes (GPX) on maps?
FAQ
Configuring settings – Layers
How to add Lima Labs tiles
User guides
Can I use Mapbox maps in Maps Marker Pro?
FAQ
How to add TomTom traffic layers
User guides
How to register a TomTom API key
User guides
Can Maps Marker Pro also display weather maps?
FAQ
How to register a HERE account
User guides
Google Maps increases prices with July 16th 2018: How this affects you (and how you can avoid high payments)
Articles
How to register a Google Maps Javascript API key
User guides
How to create custom basemaps from an image using MapTiler
User guides
How to use the official Austrian map basemap. at
at
FAQ
How to enable bing maps support
User guides
Working with maps – List of markers
How to change the pagination for the list of markers?
User guides
Managing tools
How to bulk update maps and markers
FAQ
Managing tools – Migration from v3.1.1
How to update from v3. 1.1 to v4 and migrate existing maps
User guides
Error “Failed to send request” when trying to migrate to v4
FAQ
Plugin Widgets
How can I add maps to widgets?
FAQ
Resellers
I want to sell your plugin. Do you have reseller discounts?
FAQ
Starter guide
Starter guide – how to create a basic map
User guides
Tips and tricks
Translations
How to contribute to translations for Maps Marker Pro
User guides
How to setup WPML/polylang translation support for multilingual maps
User guides
Translator registration form
Articles
Translations credits
Articles
Working with maps
How to add same-page highlight links
User guides
How to enable geolocation / “show my position” for maps
User guides
How to add snazzymaps. com custom styles to Google layers
User guides
How to create responsive maps
FAQ
Where to find QR codes for fullscreen map links
User guides
How to duplicate an existing map
User guides
How to activate the advanced settings for maps
FAQ
Can maps be displayed with 100% height?
FAQ
How to configure different styles for Google Maps basemaps
User guides
How to add maps to your site using template tags
User guides
Can I remove the attribution text from the maps?
Articles
Working with markers
How to duplicate existing markers
User guides
How to configure the popup of a marker
User guides
How to add custom map icons
User guides
Can I add a marker to multiple maps?
FAQ
How do I change the shadow of markers?
FAQ
Can I add custom map icons?
FAQ
Maps Marker Pro Plugin for WordPress Review
With no less than 72 powerful features, Maps Marker Pro is (in its developer’s words) “the most comprehensive and user-friendly mapping solution for WordPress”. Whether you’re organizing a community bike ride, looking to increase foot traffic to your Thai restaurant, or are planning the launch of a boutique bakery shop, Maps Marker Pro is the WordPress mapping solution of choice.
In this article, we’re going to take a closer look at Maps Marker Pro and reveal how many of its most powerful features can be harnessed for your WordPress website.
Primary Features of the Maps Marker Pro Plugin
Maps Marker Pro’s most basic functionality enables you to create a marker for the geographical location you have in mind, use one of over a thousand icons to represent that place, and create a link for directions. Additional text can be added in a pop-up window.
You can create clusters of markers as well. Say for instance that you’re an organic dog food manufacturer and distributer. Your customers might want to know where to purchase your product locally. You can use clusters to identify each region of the city where your dog food can be found, and consumers can find individual store locations within each region.
Noteworthy Additional Features of Maps Marker Pro
- Use shortcodes to embed maps into your pages, posts, templates, and widgets.
- Display icons are customizable.
- Choose your own base maps, including Google Maps, Open Street Map, Bing, Mapbox, and custom WMTS-maps.
- Fully responsive.
- Add QR codes of your maps to packaging, etc.
- Create a map legend.
All of these features and more are available for a one-time license fee.
Standard support for one domain is available on the Personal plan for $31. Five domains are supported on the Plus plan for $87, and the Professional plan offers support for 25 domains at the cost of $164. Although each license is a one-time fee, updates and continued support incur a yearly fee.
You can test out these features before fully committing by activating a 30-day trial. The trial seamlessly transitions into the paid version if or when you’re ready to upgrade to the Pro version.
Deciding Which Features are Best for You
With so many features to choose from, you might be wondering which ones could truly benefit you and your business goals. Let’s explore some real case studies.
Ewetopia uses Maps Marker Pro to indicate where customers can find their products. In the image below, they use clustering, layers, and icons to point to markets and restaurants that carry their products.
Examples of clustering and various marker icons
Niagra Cycling Tourism Centre created multiple maps as well. Some indicate cyclists’ routes, and others indicate where cyclists could stop for repairs and additional services along those bike routes. The third image is of a Maps Marker Pro legend.
Screenshot of the GPX tracks for the Niagara wine route
Screenshot of bicycle rental and repair markers
Screenshot of a map legend
Cartography training isn’t needed to create your own maps that look as precise and professional as these.
Bringing the World to Your (Virtual or Physical) Door
How exactly is all of this done? Let’s say you’re the owner of Mindi’s Moochi Delights & Cafe – where you sell moochi desserts, beverages, and short cook menu items. You have both a website and brick-and-mortar shop, but your primary marketing goal is to get foot traffic into your store. What would be your next step?
Step 1
After installation, click Maps Marker Pro in your administration panel within WordPress, followed by Add new marker. You should be led to a page that looks similar to this:
“Add new marker” Screenshot
Step 2
Fill out all necessary fields. You want to name the marker, enter its location, choose its map size and zoom level, assign a layer (if desired), determine the type of control box and display panel, select an icon, decide if you’d like pop-up text, and if so, enter that text, and then click Publish.
You might be prompted to provide longitude and latitude coordinates for your desired location. Here’s the easiest way I’ve found to do that. Once all the fields have been filled out, they should look something like this:
Filling out “add new marker” fields
Step 3
Copy the shortcode of your new marker from the top of the page:
This is where you grab your map’s shortcode
Alternatively, you can click the Add map button located at the top of the text editor menu of your new page or post.
Alternatively, you can insert shortcode into a new page or post by clicking the “Add Map” link
If you don’t have an existing post or page in which to display your new map, create one, then add the shortcode into the appropriate area. Format your page or post as desired, and then test out your new map. Here’s the end result:
This is how your finished map will look
This basic map has a clear image with precise coordinates. It’s sure to help patrons gain a visual understanding of the business location. Information added to the pop-up box further enhances the customer experience, as they don’t have to search for basic information such as business hours or parking availability.
Using Maps Marker Pro With a Growing Business
When you create layers,
adjacent locations become clusters
As your business or organized event grows, so can the depth of information you provide to site visitors using your WordPress Maps Marker Pro plugin.
On average, site visitors who make one map request – as in requesting to view one geographical location on your website – require hundreds of map resources behind the scenes.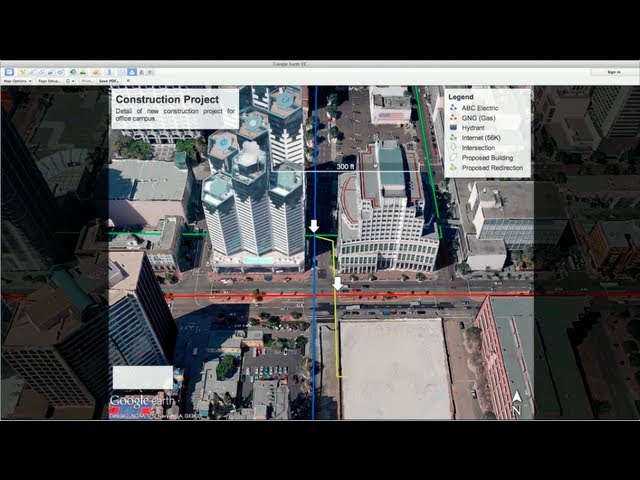 When a web server has to recall that much information, pages can potentially load more slowly, which makes for a poor user experience.
Site visitors will typically search for another website instead of waiting around for a page to load. But the good news is that the clustering option offered by the Maps Marker Pro plugin reduces page load time.
In the image above, the green circle is an example of clustering. There are two cafe locations in close proximity, so they’re clustered together. Once clicked, viewers can see the separate locations of each.
To create clusters, you’d make layers similar to the markers we went over above. Instead of “Add new marker” you’d select “Add new layer”. After filling out all the fields and saving the new layer, you can then assign your markers to appear on the layer you created. This results in the image directly above – one map with multiple clustered locations.
Have You Tried Maps Marker Pro?
The Maps Marker Pro plugin is a nifty tool that positions you to offer an added layer of information to site visitors and potential customers. It boasts dozens of features and translation options, and has a shallow learning curve, so you won’t have to carve much time from your busy schedule in order to activate and display your maps.
Get Maps Marker Pro
Do you think that the Maps Marker plugin will be a viable solution for your business? Share your thoughts in the comments section below!
App Store: FUT Map Maker 22
Description of
Create your own custom FUT cards and share it with your friends!
Settings include: name change, all statistics, and using the front camera to get your face on the map!
Features
– 213 nations
– Full map customization
– Over twenty maps to choose from
– Add staff photos from front camera or camera roll
– Share it on Facebook, Twitter, Flickr, Mail and more!
* Camera and roll camera access permissions are required to add your own images to the cards.
 000Z” aria-label=”15 августа 2022 г.”> 15 Aug. 2022
Version 7.5.0
– Bug fix
Ratings and reviews
Ratings: 1.5k
Add clubs
nine0031
Clubs
Add TOTY cards
Hello dear developers, I like everything, but I would like to see TOTY cards. Because they don’t have 4 stars. Hope you add them soon.
L
I enjoy making card for me my friends and sibilings:)
Developer Keith Galdies has indicated that, in accordance with the app’s privacy policy, data may be processed as described below. Detailed information is available in the developer’s privacy policy.
nine0006
Data used for tracking information
The following data may be used to track user information on apps and websites owned by other companies:
Unrelated
with user data
The following data may be collected, which is not related to the user’s identity:
Identifiers
nine0060
Usage data
Sensitive data may be used differently depending on your age, features involved, or other factors. Read more
Information
- Provider
- Keith Galdies
- Size
- 88.
 3 MB
3 MB - Category
Sport
- Age
- 4+
- Copyright
- © 2022 Keith Galdies
- Price
- Free
nine0007
 3 MB
3 MBDeveloper site
nine0060
Application support
Privacy Policy
Other apps from this developer
You may like
Supreme Commander Map Editor – English User Manual
Supreme Commander Map Editor
User manual in Russian
Greetings Commander! This guide is designed to help you master the map editor for Supreme Commander (Supreme Commander Map Editor). I’ll make a reservation right away that this work is not a translation of the English manual, but is an independent presentation of the principles and methods of working in the editor. Well, from talk to business!
Introduction
Map editor for Supreme Commander is a pre-alpha version (as you can understand from its English name), which was specially released by GPG for a wide range of users who, in turn, want to sculpt their own for Supreme Commander own battle arenas. It should be noted that the editor works quite stably over many hours of work, and that is how long it takes to create a good and interesting map. There is an opinion that it is better to use the editor in windowed mode, otherwise it may crash into Windows, but my own experience refutes this – use it as you like. A few words about the installation. nine0006
The editor is located in the bin folder, in the game directory, and it is Supreme Commander, not Forged Alliance.
First acquaintance
Launching the editor, you will see a window with the settings of the future map:
It is called Create New Scenario (Create a new scenario). Settings:
— Name (Name of the future map)
— Description (Your description of the created map)
– Use existing map (use an existing map, i.e. allows you to open and edit the game’s native map, in the next field ( Map File ) you select an existing map from the game directory)
– Create new map ( create a new map ), when you create a new map, check this box. He, in turn, opens up new settings for the future map.
– Width (Map Width)
– Height (Map Height)
A little about these two parameters. The editor allows you to create maps in the size of 64×64 (1 km), 256×256 (5 km), 512×512 (10 km), 1024×1024 (10 km), 2048×2048 (20 km), 4056×4056 (81 km). The maximum number of players is 8. By setting one of these parameters more than the other, you create an asymmetric, in terms of parameters, map.
– Initial Elevation . This is the “zero” level parameter in the generated map. The default value is 64, everything below this level will be various canyons, depressions, cliffs, etc. nine0125 Remember that a value of 0 will create a map with an initial level at the ocean floor, i.e. your entire map, at the beginning, will be completely covered with water. This is very important to remember!!!
– Water (Water). Below this parameter, settings for water spaces on the future map, if any, are set. Unchecking this option will exclude any water bodies from your map.
– Water Elevation This counter determines how deep the water surface is relative to ground level. That is, if the land level is 64 (zero level), and you don’t want to create large cliffs between land and water, set the water level to, say, 62, which will create a gentle slope to the sea on the map. nine0006
– Deep Elevation (Seabed level). Here, I hope everything is clear.
– Abyss Elevation (Abyss level). This parameter determines at what depth the bottom goes into the abyss dip.
A small digression. Be careful and attentive when setting counters for “water” parameters. Try to put water at least two points below land level – this will free you from unnecessary problems and headaches when creating a map. Water on a map with default water surface settings starts at level 25, keep this in mind when lowering the level of land in the settings. nine0006
Now that you have “named” your map somehow and, perhaps, given a description, set the parameters as necessary, feel free to click the Create button.
Blank canvas
Here, you clicked Create and you have a “blank sheet” of a new map. And what to do with it now? And here the most important thing begins. You must clearly imagine the future map, without this, all further is useless. But you know what you want! And to create a new tactical masterpiece, you have all the tools. They are located on the main (and, in fact, the only) top panel in the View tab. Here, in fact, you are interested in three points: Layers layers), Tools (tools) and Resources (resources), but we do not need the last one for now, we will need it later.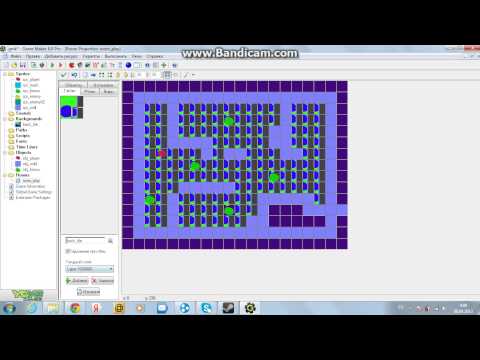 The Layers window gives access to all the editor’s tools, and the Tools window changes its appearance depending on the items selected in the Layers menu. Select these two items in the View tab, you will see two new menus appear in the editor window
The first is, as you can see, Layers, and the second is Tools, which is now called Elevation brush (relief brushes). And it turned out because Elevation (relief) was selected in the Layers menu. See? For a complete understanding, click on the different items on the Layers menu and see how the Tools window changes. We will talk about all these items later, along with the Resources menu. Now you need the Elevation item, with the help of which you will create mountains, gorges, hills, ravines, etc. As you can see, all brushes are different from each other: some are ready-made parts of the relief, while others are tools of a special type, they include: neground1k (creates depressions), round1k (opposite to the previous one), up 10_20, up 10_4. Unfortunately, it is not possible to describe these tools, it will be easier for you to try them yourself. Now about the brush settings:
– Strength (effort). Shows the force with which the brush acts on the card when it is touched once or for a long time.
– Size (size). Specifies the size of the brush, the larger the size, the larger area of the map the brush will cover.
– Maximum . This parameter sets the height of the drawn terrain above the zero level of the map, i.e. if the zero level is 64 (default), then everything above this value will be raised relief, and everything below it will be vice versa. nine0006
– Minimum . A parameter that shows the bottom border of the painting brush. Let’s say you set the Maximum to 64 and the Minimum to 62, then the brush will draw a furrow 2 units deep without producing any external relief. Remember about all these parameters when drawing relief!!!
Everything about brushes.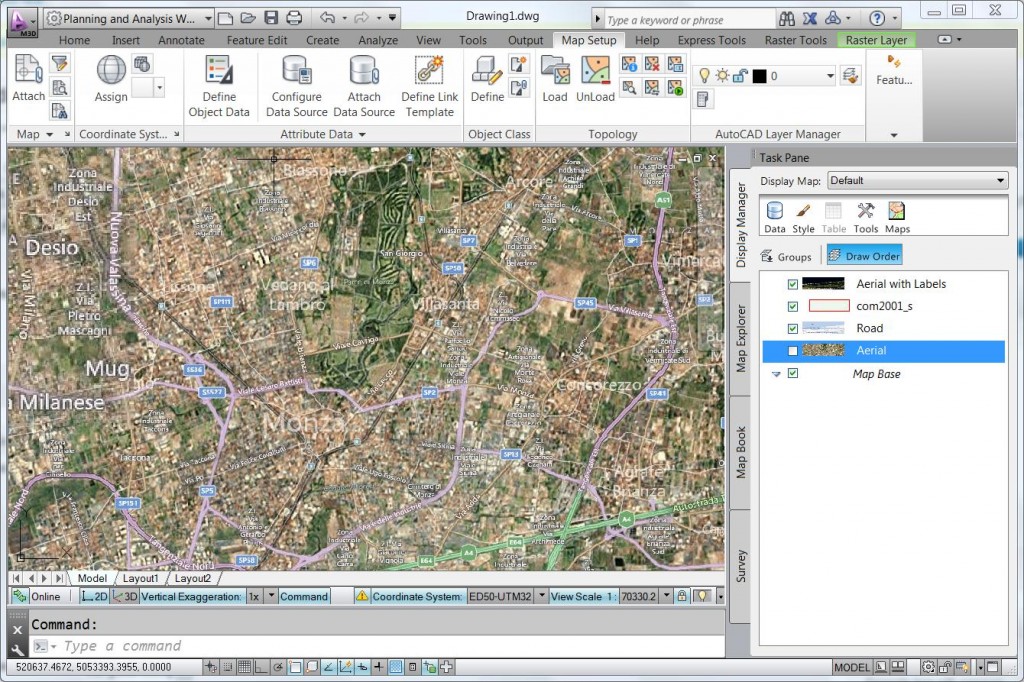 Now for the less important things.
Map Symmetry
You probably want to make your map symmetrical, unfortunately, the editor tools do not allow you to do this for a number of reasons. But don’t worry! We have a wonderful Photoshop program that will help in creating symmetry. Let’s say you’ve drawn the top of the map the way you want it to be. Now on the main panel of the editor, select the small button Edit layer properties (). Now in the Tools window you have two options: Import Heightmap and Export Heightmap. Choose the second one and save your file by giving it a name. nine0125 Remember!!! The editor only sees .raw image files! Launch Photoshop and load your saved file into it. Set the settings like this:
Click OK. A raw file of your map will appear in front of you. On the left panel of Photoshop, select the Selection Box tool (the very first one in the list) and select the already drawn area of the map. Try to select from edge to edge, covering the entire relief. Once selected, press Ctrl+C to copy the area and move the selection frame to the desired location. Now press Ctrl + V to paste the copied fragment, go to the menu Edit> Transform and expand the fragment by 180 (rotate 180). Also, in this menu, you may need to Flip horizontally and Flip vertically, when you put the fragment in the right way, save the changes. It is better to save the file under the same name under which it was opened. Before saving, Photoshop will display a small settings window, set it to IBM and save. Close Photoshop and return to the editor. nine0006
Now in the Tools window select Import Heightmap and open the edited raw file. Well, what are your impressions? Symmetrical? Well, you see, it’s not that difficult.
It’s time to talk about two other main menu items that are indispensable for creating good relief. These are the buttons located on the main panel next to the Brush button: Raze elevation and Filter. Activating the Filter item changes the set of brushes to new tools: blur 128, sharp 128, unsharp 128, unsharp 128_hard. A little about these tools:
– blur 128 . Designed for smoothing sharp corners and protrusions
– sharp 128 . On the contrary, it makes corners and protrusions more distinct
– unsharp 128 . It is similar to the blur tool, only its task is to create smooth transitions between different surface levels, smoothing out sharp transitions.
– unsharp 128_hard . A copy of the previous one, but unlike it creates sharper edges of the transition
The Raze elevation button contains only one tool, it is ideal for creating surfaces strictly on the same level without potholes and transitions.
When creating a map with water surfaces, you will most likely encounter such a problem as sharp ledges at the border of water and land, as well as excessive land ribbing in this place. This is where the Layers menu item called Water will help you. Selecting it, you will see only two tools neground1k and round1k. Select the second one and click on the water surface, you can see that the sharp border has disappeared, the ribbing has decreased. If you look at the main panel, you will see that there is another function for the Water item tools, it is called Water waves. This function helps you to create different types of waves in your sea-ocean. In terms of terrain, that’s it. nine0006
Remember!!! When creating a terrain, it is always necessary to check the areas where construction will be carried out and troops will pass, for this, by pressing the “O” key on the keyboard, activate the Slope function. The map will turn green and red, some areas will remain unpainted. Green shows where construction is possible and troops will pass, red – construction is impossible, troops will not pass, a colorless area – troops will pass, but it is not possible to build. Press “O” again to disable the function. nine0006
Placing markers
Now that you’re done with the relief, it’s time to place the markers. To do this, select Markers from the Layers menu. You will see a window with all the existing markers in Supreme Commander. You are currently interested in Blank marker. He is responsible for the appearance of the BMK on the battlefield in a specific place and for the appearance of the BMK in general. In order to symmetrically place the markers, you need to do a few simple things. On the main panel, select the Options tab and activate the Snap to grid function (snap to the grid), this will provide you with the placement of markers according to the grid that is in the game, to activate the visual display of the grid in the editor, go to the tab View> Debug> Grid (grid) . The grid will appear in the editor window, making it easier to place markers. To place a marker on the map, simply drag it from the markers menu onto the map. Suppose you have a card for two players, respectively, two blank markers. At the bottom of the marker menu, rename Blank Marker 00 to ARMY_1 and Blank Marker 01 to ARMY_2. Now, in the Layers menu, select the Armies item, in the window that opens, press the leftmost button, thereby creating an army, press the button twice.
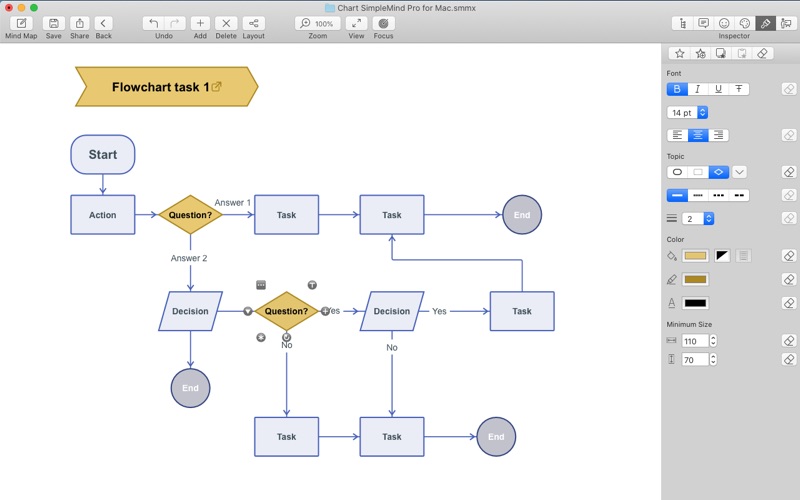 You will have two armies. Next, in the Layers menu, select Game. In the window that opens, in the Configuration column, click the Add button and rename the new configuration to standard. Next, in the Team column, select New Tem 1 and drag ARMY_1 and ARMY_2 onto it
Save your changes and close the editor. Open the maps folder in the game directory and find the folder with your map. In the game folder, open the